
Jiggly Japanese Cheesecake
To make your delightfully wobbly cake you will need a 20cm high sided cake round and parchment paper to line the tin, as well as the following ingredients:
- 100g butter
- 100g cream cheese
- 130ml (135g) milk
- 8 eggs, separated
- 60g plain flour
- 60g cornflour
- 130g caster sugar
Directions
Depending on your tin, grease and line appropriately and preheat your oven to 1200ºC fan.
In a small saucepan combine 100g cream cheese and 100g butter over medium heat until incorporated then add in the 130ml of milk and whisk until it all comes together, then remove from heat.
In a heatproof bowl, whisk the yolks until smooth, then slowly stream in the milk mixture and whisk the whole time to prevent the eggs from scrambling, until wholly combined and smooth. Once the yolks and dairy mixture have come together, sift in the flour and cornflour and whisk until smooth. Set aside.
In the bowl of a stand mixer beat the egg whites until soft peaks form. Then slowly add the sugar in spoonful by spoonful, continuously mixing until stiff peaks are achieved.
Fold egg whites into the batter one quarter at a time until evenly combines. (Be careful not to over mix or mix too vigorously as that will deflate the eggs whites).
Transfer batter into your prepared tin and tap on the counter 2x to remove air pockets. (If you need to settle the mixture further take a skewer or chopstick and stir through the batter, starting from the edge and spiralling to the centre).
Place your filled pan in a hot Bain Marie and place on the middle/middle-low rack to bake.
- Bake at 120ºC for 20 minutes
- At the end of the 20 minutes, without opening the oven, turn the temperature up to 150º and bake for 15 minutes.
- Next, open the oven door for 10 seconds, lower the temp to 100º and close the door to bake for 40 minutes.
- At the end of the 40 minutes, turn off the oven and let the cake rest in the warm oven for 10 minutes.
- Transfer immediately as any paper will need to be removed whilst still warm and enjoy.
Notes:
- When turning out the cake, I cover the top with a clean tea towel and flip it onto a plate to remove the paper then flip it back onto my serving platter of choice.
- Also, the cake will settle and become less jiggly as it cools, so snap your videos and make your gifs whilst it is still hot and wobbly.
- You can brush the top with apricot jam or diluted honey to give a nice sheen
Génoise
For the Génoise you will need:
- 50g butter, melted, and some to grease the tins
- 250g plain flour, plus extra for dusting
- 250g caster sugar plus 1 tbsp
- 8 medium eggs
- Pinch of salt
Start off by preheating the oven to 190C/170C fan. Grease your tins with some butter and then dust with flour. (I usually tip out the extra flour into a bowl that I am going to use for the batter, so as to not waste any). Set aside.
In a heatproof bowl, add your eggs and sugar and plat over some barely simmering water. Whisk the egg and sugar mixture until tripled in size and it is nice and pale, approx 7 minutes with an electric hand whisk or 14 minutes if doing it manually. Once the size and colour have been achieved remove from heat and stir in your melted butter until fuller incorporated.
Sift in your flour and a pink of salt to the egg and butter mixture and gently fold it in until there are no dry streaks. Pour into your prepared tins and pop into the oven. Bake these for 25 minutes or until a skewer comes out clean.
Once removed from the oven, let the cakes cool in their tins for a few minutes before turning out onto cooling racks to cool completely.
Decorate as you will! In my Instagram post, that cake was done up with Swiss meringue buttercream, little pastry roses and vines, and filled with apple pie filling!
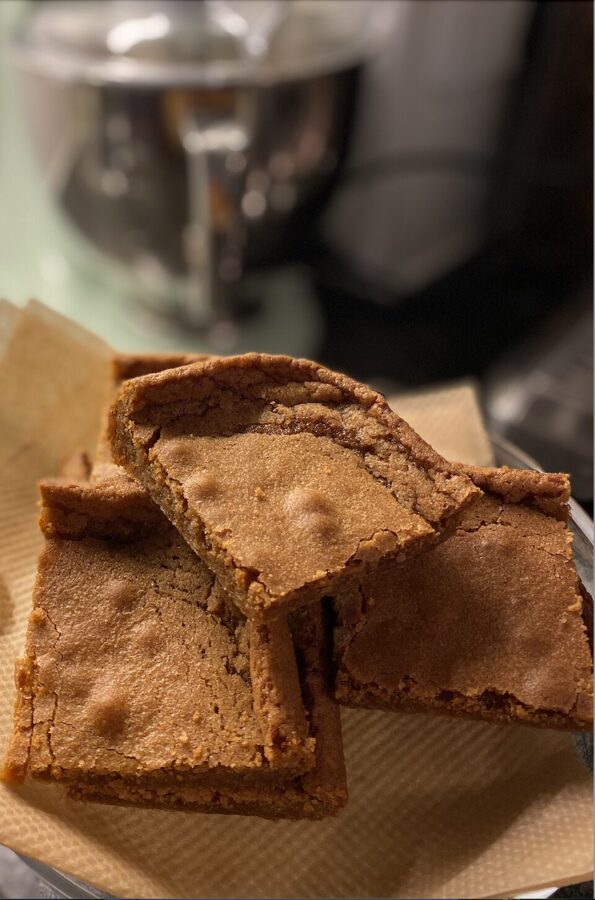
Blondies
For the blondies you will need a 20cmx20cm or 8inx8inch baking tin, greased and floured, as well as the following:
- 112 g butter, melted (coconut oil for a vegan version)
- 220 g tightly packed brown sugar
- 1 large egg, lightly beaten (banana for V)
- 1 teaspoon vanilla
- 1/2 teaspoon baking powder
- 1/8 teaspoon baking soda
- Pinch of salt
- 128 g plain flour
Optional
- 60 g butterscotch chips (pecans or walnuts also go well with blondies)
Preheat your oven to 175 C
Set the butter to delicately melt in a pan on the hob. I cut the head when there is only a knob of butter left and let the residual heat do it's thing. This also helps to ensure that you do not scramble the egg when you incorporate the butter later.
Whilst the butter is melting, stir together your flour, baking powder, bi-carb and salt in a bowl and set aside.
In a separate bowl gently fluff the egg with your vanilla extract and stir in the brown sugar. Whisk your melt butter in until incorporated. If you are worried about the heat, stream the butter in whilst mixing and let the butter land on the side of the bowl first before sluicing into the mix.
Incorporate your dry ingredients and then transfer to your prepared baking vessel. Pop into your preheated oven for 20-25 minutes, or until a skewer comes out clean. Once the blondies are done, allow them to cool and settle in the container before cutting and removing. Now the real question is, are you an edge or a middle? Enjoy!
Patatas Bravas
Look, I have never met a potato I do not like. Mashed; good. Fried; good. Vodka? GOOD. But there are some potato variations that are humble. Patatas Bravas on the other hand is flashy, with a punch of flavour and some nice deep colour.
You will need:
- 500-600g potatoes (I like new/fingerling potatoes)
- 1 cup olive oil, with 1/3 reserved for the sauce.
- 1/2 tsp cayenne pepper
- 1 and 1/2 tsp paprika
- 2 Tbsp flour
- 1 cup chicken broth
- 1 Tbsp tomato puree
- Salt
- Kewpie mayonnaise
Bring a pot of salted water to a boil as you prepare your potatoes. After you have washed the potatoes and removed the eyes, depending on the size of the potato you are using, you can quarter them before dropping them into the boiling water. Boil for 10 minutes, drain, then let them rest in the fridge until you can handle them.
Heat a frying pan with 2/3 oil over medium-high heat and set your oven to 160 degrees fan. Returning your attention to the potatoes, halve or quarter them to make manageable bites, the drop into the heated pan. Brown the potatoes on all sides before, ~5 minutes altogether, before salting them to taste and popping them in the oven to bake, approx 15 minutes.
Whilst the potatoes bake, heat the remaining 1/3 cup olive oil in a small saucepan over medium. Stir in the cayenne, paprika and flour, this will make a roux, much like the start of a bechamel. Cook the flour for about two minutes. Reduce heat to medium-low and add the broth and tomato puree, continuously stirring until a thick, smooth sauce is achieved. Cook for a further 3-5 minutes and salt to taste. Cover your pan and set on the back burner or you can pop the sauce into a thermos to keep warm.
When ready to dish up the potatoes, transfer them to a dish, slather in the bravas sauce, squiggle some Kewpie on top, then sprinkle with some paprika. Sure to bring some flair to your table, Patatas Bravas are enjoyable as a part of any spread. Happy eating.
Sandwich Bread
For the bread you will need:
- 500g Strong bread flour
- 1 tsp salt
- 1 tsp sugar
- 15g butter, softened
- 7g active ready yeast
- 325g warm water
- Eggwash/glaze
Add all of your ingredients, except water into the goal of your stand mixer. On low, gradually add the water as you mix until a cohesive dough forms. You may not need all the water.
In the mixer knead the dough for at least 5 minutes. The longer you let the mixer go, the more you develop the gluten, so I do suggest letting it go for 10 minutes if you can. If you are mixing by hand, knead for a total of 15 minutes.
When shaping the dough for sliced bread, roll out the dough until it is just as wide as the bread tin and approximately 30cm. Roll the dough up much like a roulade (this makes for the lovely iconic crumb the sandwich slices have) and then set seam side down in your baking vessel.
Once your bread is in the tin, cover it with a damp towel and let prove until double in size. (This is dependant on daily temperature and the ambient temperature of your cooking environment and may take anywhere from 30 minutes to 1 hour. Sometimes, if it is cold, I will place my bread on top of the tumble dryer, if in use, in the airing cupboard. You can also turn the light on in your oven and let the bread prove there.)
When your bread has reached the desired size, preheat the oven to 190c or 170c fan. Whilst the oven comes to temperature, wash the top of your bread with the egg or, alternatively, milk, cream, oil, or a mixture of milk and oil are all good substitutes for eggs. You can also score the top if you like.
Place your bread on the middle rack of the oven and bake for approximately 30 minutes, until golden brown. If your bread is baking inside a mould, remove it from the mould and bake on the rack or a tray for a further five minutes to develop the crust on the lower portions of the bread. To check if the bread is done, tap the bottom of the loaf. If it sounds hollow, then it is ready.
Allow the bread to rest for 15-30 minutes, it really is worth waiting even though it will smell heavenly and irresistible, before slicing. Slice up for toast, making a sandwich, or - my favourite - take a warm slice with some butter and salt. You will wonder why you didn't make your own sandwich bread before!
Garlic knots
Keeping with the theme for the week, we are doing another I-talian classic! Garlic knots are just a fan favourite that are easy, full of flavour, and great for a party or do. This recipe ensures a really lovely developed crust, a soft inside, and buttery garlicky goodness.
For the dough you will need:
- 300 ml water, room temperature
- 2 and a quarter tsp or one packet active dry yeast
- 1tsp salt and some extra for topping
- 1 Tbsp granulated sugar
- 1 Tbsp butter, room temp/soft
- 475-500g plain flour
- 120g Bi-carb soda
For the dressing:
- 4 Tbsp parsley, chopped
- 6 garlic cloves, minced
- 6 Tbsp butter
- 2 Tbsp olive oil
- 1 Tbsp Italian seasoning
Directions
Bloom yeast in warm water (1 part hot to 2 parts cold) for 1 minute in your mixing bowl. Whisk in the salt, sugar and soft butter. Slowly mix in 400g flour. Using a dough hook, mix on low until the dough is thick, approximately 10 minutes. If doing by hand, use a wooden spoon and mix for about 15 minutes. Add the remaining flour until the dough is no longer sticky, you may not use it all. To check if it is ready, poke the dough, if it isn’t sticky and the dough bounces back, you are good to go. Do not be afraid to keep adding flour until this is achieved.
Turn the dough out onto a lightly floured surface, knead and shape into a ball. Cover the dough and let rest for 10 minutes. Whilst resting, prep the lye bath by adding ~2 litres of water to a pot with 120g of bi-carb. Bring to bath to a boil and preheat the oven to 240c.
Mix all of your ingredients for the dressing and gently melt together. Set aside so that you can brush it onto your prepared knots.
Line baking sheets with parchment paper or a Silpat. I prefer to use a Silpat but if using parchment, just lightly oil it after fitting it to the tray.
Return to your dough, with a sharp knife cut the dough into
equal portions. Roll each portion into a rope, coat with flour, and tie into a knot.
Once all the knots are shaped, drop them into the
boiling bath, avoiding overcrowding the pot, and let them bathe for approximately 25 seconds. Do not
exceed 30 seconds as this will alter their taste. Fish the knots out with a
slotted spatula or spoon and allow as much of the excess water to drop off. Place the
knots onto the prepared baking sheets and brush with the buttery garlic mix. Repeat with the remaining knots until they have all had a bath.
Bake the knots for 10 minutes then brush with more butter and return to the oven to back for a further 5 minutes, or until nice and brown. Once the knots have reached your desired colour, pull them from the oven and toss in a bowl with the remaining butter mix, sprinkle with some salt (or garlic salt if you want even more punch) and serve warm and enjoy a vampire-free evening!
Pizza
To make the dough you will need:
- 364ml cold water
- 18g salt
- 7g instant dried yeast
- 607g strong bread flour, plus extra for dusting
- Desired toppings
Place 2/3 of the water in a heat-safe bowl. Bring the remaining water to boil and pour into the cold water, this is a sure-fire way to ensure the water is the perfect temp for activating the yeast. Stir in the yeast and allow it to bloom in the warm water, ~5 minutes.
In the bowl of a stand mixer, add all of your flour and fix a dough hook attachment. Once your yeast has bloomed, turn on the mixer on flow and slowly pour the yeast mix in. Allow this to go for 5 minutes then add your salt, then allow it to mix for a further 5 minutes. It should be a sturdy and elastic dough. Cover the dough with cling film and let rise for 2 hours, or doubled in size, in a warm place. (You could do this overnight in the fridge if you wanted, just ensure you bring it out 5 hours before you intend to work with it and it is at room temp before moving on to separating the dough).
Once the first prove is done, separate the dough into three of four balls, place with ample space on a tray and cover and let rise one more time, approx 45 minutes, or until doubled in size.
Preheat the oven and baking vessel to 240C.
It is now time to shape your dough! Starting with a round ball on a floured work surface, press and stretch your dough into a disc, being careful to not tear it. Once the desired size is reached, you can crimp the edges to make a crust and add the toppings. avoid overcrowding the top/making it too wet.
Carefully transfer your pizza to a preheated pizza stone or baking track and pop it into the oven to bake for approximately *30 minutes. If you really want to laden the top of the pizza with all sorts, you can blind bake your pizza dough for 12 minutes, then add your sauce and toppings and bake for a further 20 minutes. Guten Appetit!
*Assess as you go. Ovens vary and depending on how thick your dough is, how many toppings there are, if you do more than one pizza at a time, the bake duration, it will vary and you should adjust accordingly.
Pici Cacio e Pepe
For the dough you will need:
- 200g strong flour
- 1/4 tsp salt
- 1 tbsp extra virgin olive oil
- 95g warm water
- Flour for dusting
For the cacio e pepe sauce:
- 1 tbsp black peppercorns, crushed
- 1 tsp lemon juice
- 1 tbsp white wine
- 40g butter
- 160ml (2/3 cups if you have measuring cups) pasta water
- 60g finely grated parmesan cheese
Optional
- Cherry tomatoes, halved
- Parsley, rough chop
To make the pasta add your flour, salt, oil and water into a bowl and mix until it forms a shaggy dough. Knead for six to ten minutes until you get a smooth, soft, elastic ball. It will be a bit tacky to the touch but it shouldn't be overly sticky. You can also do this in a mixer with a dough hook. Wrap the dough in cling film and rest in the fridge for an hour, or this can be made up to 24 hours in advance.
When you are ready to work with the dough take it out of the fridge and place it on a clean, dry work surface, do not use flour, as this will make it nigh on impossible to roll and shape the pasta. Prep a baking sheet with some flour in that as a landing place for your shaped pasta. Set a pot of well-salted water to boil, so it is nice and ready when you are done making your pasta.
Press and stretch the dough gently with your fingers to make a rectangle that is approximately 12 cm x 20cm. Using a sharp knife or dough scraper, cut the dough into strips, so that is 12cm long and about half the width of your thumb. Using both hands, roll and stretch the strip starting from the middle until it is about double in length. Place the pasta into the tray with the flour and give it a good coating of the flour to ensure it does not stick to anything. Before moving onto the next piece, ensure your hands are not covered in flour and repeat the process until all the dough has been turned into pasta.
Let your pasta rest to the side as your gather all your ingredients to make the cheese and pepper sauce. Do cover the pasta if you are worried about it drying out or you are not going to use them within the next 20 minutes. Once you have all of your sauce ingredients ready to go, add the pepper, butter, lemon juice, white wine and set the pan to medium heat. All that is needed now is the pasta water.
Add your pici to your boiling pot of water and let the water return to a rolling boil, stirring occasionally to ensure they don't stick. When the boil is back, set your timer for 3 minutes and 5 minutes. At the 3-minute mark, take out your 2/3 cups of pasta water and add it to the saucepan, reducing the heat to medium-low. At the 5-minute mark, transfer the pici from the water directly to the pan using some tongs. All that starchy water is going to help the sauce set up and coat the noodles.
Once your pasta is in the pan with the sauce, give it a stir to cover the noodles, then coat the surface of your pasta with an even layer of parmesan. Do not agitate, disturb, fiddle or mess with it at this point. The cheese needs to melt and incorporate and you could risk a claggy sauce if you do not let it settle in. When the cheese has melted and the cheese at the centre of the pan has gone translucent, this should only take a couple of minutes, you can toss the contents together and ensure everything is combined. If you are using it, add your cherry tomatoes and parsley now, and let the pasta simmer for a further minute or two to get the sauce to thicken, stirring occasionally. When the desired thickness is achieved, plate up and enjoy!
Pici Cacio e Pepe has a satisfying squidgy texture and the sauce is smooth but not heavy. I like the cherry tomatoes as they add brightness to the dish and break up the peppery profile of the pasta. It truly hits all the marks.
Pommes Maxim
To make Pommes Maxim you will need:
- 2-3 medium-sized potatoes
- 55g butter, clarified
- Herbs to decorate
- Some salt
Preheat your oven to 190C.
Using a mandolin, slice your potatoes into thin and complete discs. The thinner you can go, the more transparent your potatoes will be. Pair up the discs in multiples of 8 (each ring of pommes will need 16 discs total to make 8 pairs). In between your discs, you add little leaves of parsley, thyme, or even edible flowers. The starch from the potatoes will hold them together.
Prepare your baking sheets with some parchment or a silpat, and brush with the clarified butter. Arrange your paired potatoes in a circle, ensuring they overlap, and brushing with butter as you lay each slice down. Once you have assembled the rings, or crescents, sprinkle some salt over them, and cover with more parchment or a silpat. Weigh the potatoes down with another tray, or a few, and bake in the oven for 20 minutes. Check on them at the time, if they need more time, add increments of ten minutes and remove the weights. The edges should start to brown and be crispy, that's when you know you are done. If you find they are still not crisping but browning, remove the coverings altogether, cut the heat, and leave the oven fan on to dry them out. Then plate up using your (hopefully) gossamer potatoes, and enjoy!
Roast Chicken
You will need:
- 1.5kg chicken
- 2 onions, quartered
- 2 carrots, roll cut
- 1 lemon, halved
- Thyme, a small bunch
- 4 garlic cloves, whole
- 25g butter, or enough to coat the chicken and put some under the skin
- 2 Tbsp flaky salt
- 1 Tbsp ground black pepper
- 1 Tbsp paprika
- 450ml chicken stock
- 225ml white wine
- 1 Tbsp cornflour
Optional
- Potatoes
- Rosemary
Set your oven rack in the lower middle part of the oven and ensure that the overhead is clear. Preheat oven to 170C fan.
In a roasting dish that is large enough to not crowd the chicken, add 1 quarter onion, 2 roll cut carrots, 2 cloves of garlic and half of the thyme bunch. Then add to the dish your stock and wine. You can also add the optional ingredients at this stage.
In a small bowl mix your salt, pepper and paprika together and set to the side. Also, portion out your butter on a separate plate and set to the side. This will help to prevent any contamination from working with the chicken.
To prepare your chicken, boil a kettle and in the sink on a wire rack, pour the boiling water over the chicken skin to firm it up, this will help it be nice in crispy after roasting. Once you can handle the chicken, pat any excess water away and transfer to your cutting board/work surface. Add a generous pinch of your seasoning mix to the cavity, then stuff the chicken with your remaining herbs, veg and the two lemon halves. Whatever you cannot fit in the bird can go with the rest of the accoutrement in the roasting pan.
Massage the stuffed chicken with the butter, getting some under the skin, and even if the cavity, should you like, or have extra. Then sprinkle your seasoning mix over the chicken and rub it in. Set the dressed and stuffed bird on the veg in the pan.
Transfer the chicken to your preheated oven and absolutely leave it alone for one hour and twenty minutes. This is the real key here, do not disturb the bird or the oven during this time! At the end of the bake, check to see if the juices are running clear, or use a meat thermometer to ensure the temperature is just right.
When the bird is finished, remove from the oven, cut the heat and transfer the chicken to a platter to rest, doing your best to drain any juices and stuffing from the cavity before departing the roasting dish. Allow the chicken to rest for 15-20 minutes, you can lightly tent with some aluminium, should you please, but do allow moisture to escape as to not compromise the crispiness of the skin.
Returning your attention to the roasting dish, reserve any carrots - potatoes if you used them - that you wish to have with your roast, leaving just a few in the sauce. Place the reserved veg in the gradually cooling oven to stay warm during the resting. We have a roasting pan that you can use right on the hob, so I boil whatever is left in there with all the herbs, stuffing and veg. Once a boil has been achieved, gently use a potatoes masher to further extract the flavour from the contents. Transfer all of this through a fine sieve into another pot, squeezing out whatever juice you can and then discard the mush. Continue to reduce your jus on meduim. Any juice that has come from the resting chicken can be added to this pot now.
Make a slurry of 1 Tbsp cornflour to 2 Tbsp cold water, and whilst constantly stirring the jus, add in the slurry to thicken into a gravy. This will really set up as it cools down, so be cautious of adding any more starch, lest you want a very thick gravy. Cut the heat and cover.
At this point, your chicken should have rested enough. Carve up, grab the veg out of the oven, and set the gravy down next to it, et voila, roast dinner!
(I intentionally left off the Yorkshire puds because everyone has their method and option, but I am of the school of thought that they can be done at the very last stage during the resting period, as Yorkshire puddings bakes are just at the longer end of that time window and I prefer hot puds.)
Shortcrust Pastry
To produce a base for a tart flute 9" round, or for 4-6 small pasties, you will need:
- 125g Plain flour
- 55g butter, cold
- 2-4 Tbsp water, cold
- Pinch of salt
Optional
- 2 Tbsp sugar
- Replace some of the water with milk
*This recipe can be doubled if you would also like a lid for your bake or just more of a thicker base.
The key to achieving delightful pockets of air in your pastry, thus the flakiness, is to know how to treat the butter. It should be cold, cubed, and worked with sparingly.
In a bowl with the flour, salt, and butter, rub the butter into the flour until you have petit pois sized butter granules. A lot of recipes will tell you until you achieve a consistency resembling breadcrumbs; bunk, I say! By having the butter a little larger, we can get bigger pockets of air in the pastry. This is because once the butter has steamed/melted during the baking process, it leaves space, thus producing that coveted flake.
Once you have rubbed the butter to the right size, adding the water tablespoon by tablespoon and stirring gently allows us to see when the flour mix comes together in a nice shaggy dough. It shouldn't be too wet, but just coming together. Any bits that have not joined the dough ball can be pressed and formed into the dough ball, just being mindful of and gentle to not further break the butter. Wrap the dough in some cling film and let rest in the fridge for at least 20 minutes. This is a good time to prepare any fillings and baking vessels or, alternatively, you can prepare the dough well ahead of your bake.
When ready to work with the dough, flour your work surface and the rolling pin. Roll out the dough quickly and sparingly. The more you manipulate it, the more chance you have of losing the butter into the pastry, so less is more. When the pastry is the right size for your baking vessel, transfer it over and once again return to the fridge to set up. If doing hand pies or pasties, I would suggest resting the dough in the fridge again before shaping them, as this helps with handling and shaping the pastry.
As mentioned earlier, if you are doing this for something like apple pie, you can swap out some of the water for milk and add 2 tablespoons of sugar to the dry mix when rubbing the butter. It really is that simple.
And there you have it, flaky butter pastry dough, for savoury and sweet bakes! Just remember to be nice to the butter, leave it a little larger than most recipes say, and if you are baking a wet mix, blind bake the pastry first. Happy baking.
*Update*
I did read that you can use vodka instead of cold water as this doesn't interact/alter gluten the same way as water, also it helps to mitigate moisture as it more readily evaporates and burns off.
No-Bake Cookie Dough
You will need:
- 115g butter, room temp
- 100g light brown sugar
- 50g granulate sugar
- 30ml milk
- 1 tsp vanilla
- 150g Plain flour, heat-treated
Optional
- chocolate chips, chocolate chunks, butterscotch chips, marshmallows, nuts etc
Cream together the butter and sugars, once combined, add the liquids, and stir for cohesion. Add your heat-treated flour and mix together et voila, cookie dough! This can be stored in the fridge in an airtight container for about a week.
I personally leave it plain until I need it specifically for something. All you need to do is let the dough get back to room temp before adding your accoutrement and combining. It is always easier to add things to take away!
This dough can be eaten straight off the spoon, used in mochi, or as a layer in wicked cool birthday cake, like below:
However you decide to enjoy this sweet and simple cookie dough, it is sure to hit the spot! Enjoy!
Devils on Horseback
Before we get to the ingredients, let's just close our eyes and imagine the delectable range of tastes and textures of these hors d'oeuvres. A warm parcel of salty, sweet, squidgy goodness harbouring a delightful crunch, wrapped up in the crisp and chew of an outer layer. C'est magnifique.
Basically, if you like streaky bacon and blue cheese, this is good for you.
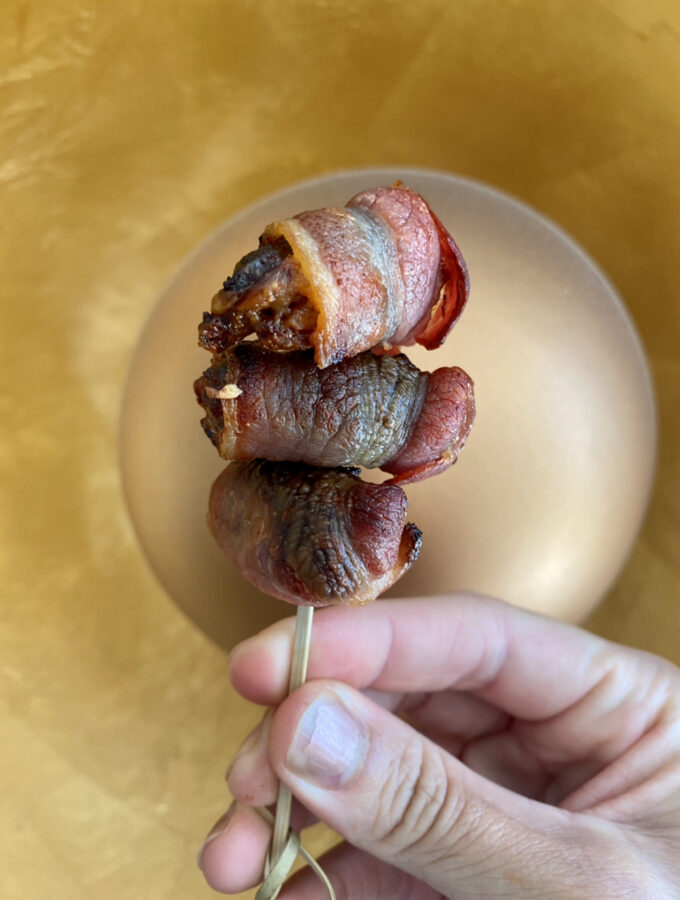
You will need:
- 12 Medjool dates
- 12 pecans or almonds
- 1 Wedge of blue cheese
- 12 slices of bacon
Preheat your oven to 200 C/180 fan and line a baking sheet with parchment or non-stick foil.
Slice open the dates, avoiding cutting all the way through and remove the pit. Replace the pit with your nut of choice and stuff with some blue cheese. Wrap a slice of bacon around the dates and contents, attempting to seal it in as best as possible, as we don't want any blue cheese escaping.
Arrange your devils on the tray and bake for approx 20 minutes. The middles will be molten hot, so allow to cool a touch before serving. Transfer to your serving dish, share and enjoy!
Mool Naeng Myun
There is an array of cultures that have dishes that help to address exactly this issue. Most famously is Gazpacho, which in its popularity is widely available now in cartons at the supermarket. If you are tired of the perennial favourite, may I suggest Mool Naeng Myun?
Mool Naeng Myun is soup served cold with noodles in a broth. After that, there are many variations of accoutrements, but typically it comes with a hard-boiled egg, cucumber slices, radish, Asian pear, some variety of protein and on the side some vinegar and mustard for the diner to season to taste.
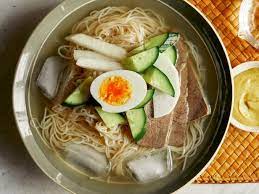
I am not suggesting attempting to make this yourself as there are many components, but if you have a vibrant K-town or know of a Korean restaurant, treat yourself to this savoury and refreshing dish, skip the cooking and prep, (honestly, who can be fussed!? I am melting), and enjoy something that is a little more hearty than some pureed vegetables.
If you are in NYC, check out Dons Bogam (shoutout to @linarose.lee for introducing me to this place!) and here in London definitely go to Hozi in Holborn., and finally, if you are in the SF Bay area, you cannot beat my family's place, Beque Korean Grill! Happy adventures and happy eats!
Thai Laarb
Aromatic, spicy, tart, salty, this is a good dish if you want to titillate your tastebuds but still want a "salad". That being said, the main ingredient is meat, but there is plenty of veg and herbs that goes in it and alongside it.
The secret ingredient for this dish though is toasted sticky rice! One can find pre-made rice seasoning in Asian markets, or from this site if you are here in London, but it can be hit or miss. Thankfully it is easily made at home. All you have to do is roast some rice in a pan on the stove stop, and once it is nice and brown you can crush it in a mortar and pestle with some red chilli flakes, or if you want to go the modern route, bung it all in a food processor/blender and pulverise it to make a powder. Some people leave out the chilli until the end, so they can better tailor the heat. However you prepare it, once it is a fine powder, store it in an airtight container and you are good to go.
To make Laab, you will need:
- 500 g minced pork or chicken
- 1 bushel of coriander
- 1 bushel of mint
- 5 shallots, sliced
- 6 Thai chillies, chopped
- 8 cloves of garlic, minced
- 2 Tbsp toasted rice powder
- 1 Tbsp fish sauce
- 2 Tbsp lime juice
- 1 tsp sugar
Optional
Spring onions
In a pan heated to medium-high with some oil, cook your protein until done. Add a Tbsp of rice powder, 6 sliced chillies (or however many to suit your tastes), minced garlic, shallots, 1 Tbsp and fish sauce, 2 Tbsp lime juice, and 1 tsp of sugar. Stir to combine. The contents should have a sheen, if the mix is too dry, add just enough water to coat the mix. Reduce heat to medium-low.
Next add 2 Tbsp each of the mint and coriander, stirring to combine. Cut the heat and do a taste test, adjusting as needed. When satisfied transfer to your serving dish and garnish with the remaining coriander, mint, and spring onions if you are using them.
Laab can be served immediately with some rice and romaine lettuce cups, or reserve the Laab for later. Traditionally this can be served at room temperature, but I enjoy it refrigerated, especially during a heatwave like this! Either way, this aromatic and refreshing dish will hit all the spots with its full flavour profile. Enjoy!
Cong you bing / Spring onion pancakes
To make enough pancakes for two, you will need:
- 1 cup plain flour and some for dusting your work surface
- 1/2 cup boiling water
- 1 cup sliced spring onion
- Toasted sesame oil for brushing
- At least 30 minutes to rest the dough
For the dipping sauce you will need:
- 2 Tbsp soy sauce
- 2 Tbsp white wine vinegar
- 1 Tbsp sliced spring onions
- 1/4 tsp ginger, grated
- 2 tsp sugar
- 1 tsp sesame oil (optional)
In a little bowl combine the sauce ingredients and allow to rest and marry at room temp. This can be prepared during the resting of the dough or before you start to shape and cook the pancakes.
For the pancakes, in a heat-safe bowl add your flour and slowly stir in your boiling water with some chopsticks. You might not need all of the water. As soon as the flour starts balling up, you are good to go. I also find putting a towel under the bowl helps to keep in place as you work the hot water into the flour. Once your dough has come together, knead until you get an elastic smooth ball. Cover with a damp towel and leave to rest for 30 minutes, however, the longer the better and this can even be prepared the night before and left to rest in the fridge, covered in clingfilm, overnight.
The boiling water and resting negates gluten development and is what allows the dough to stay flat and give it a nice chewy texture, so don't skip! I usually end up going for a run during this rest period, so planning ahead can certainly help with "dead" time.
Once the dough is rested, dust your work surface and tip out the dough. Divide the dough into 4 balls. Working with one dough ball at a time, flatten the ball into a disk ~15cm in diameter. Sprinkle some spring onion on your dough and then roll the disk up into a log, then spiral the log into a cinnamon bun shape, tucking the end under, this is what is going to help make layers in our pancake. Flatten the bun into a disk again, brush the disk with the sesame oil and then sprinkle more sliced onions onto it, roll up and flatten again before setting it to the side on your damp towel. Repeat with the remaining dough balls and spring onions.
Heat a pan on medium-high with about 1/4 cup of oil. Once the oil is shimmering, slip your pancakes into the oil, avoid crowding the pan, and cook the pancakes for about 2 minutes on each side. It should make a nice brown, crispy pattern. Set aside to drain whilst cooking off any remaining pancakes.
Serve hot and quartered with dipping sauce.
Mochi!
Once upon a time, you would have to steam glutinous rice and pulverise it into a paste to make the cake. These days you can get glutinous rice flour and whip up a batch quite easily. To make your own mochi you will need to the following:
- 1/2 cup of milk (coconut milk or plant-based milk work too)
- 1/3 cup sugar
- 1/2tsp vanilla extract
- 2tsp coconut oil
- 1/2 cup glutinous rice flour
- Cornflour or potato starch for dusting and work surface
- Ice cream for filling
- Optional - food colouring for the dough
Before starting the dough, scoop 4-6 ice cream balls in your desired flavour and return to the freezer to set. Depending on the size and amount you want, you can use a muffin mould, gaiwan (Asian tea cups), or egg cups, to help with the shape, just line with some cling film for easy removal later. The larger the vessel, the larger the mochi and you would be able to produce as many, so bear that in mind.
Whist the formed ice cream sets, in a pan, combine the milk, vanilla, colouring and coconut oil and warm through until the coconut oil has melted, add in the sugar, stirring until it is dissolved. Once the mixture is smooth remove from heat and add in the rice flour, whisking constantly to avoid clumps. Once homogenous return to the hob and set to a medium/medium-high heat and with a rubber spatula, stir constantly until the dough cooks into a gummy and elastic dough ball.
Transfer dough to a heavily dusted surface and coat hands in the starch. Gently press and rollout out the delicate dough into a rectangle. Cover with clingfilm and let rest in the fridge for 20 minutes.
After resting, take out the dough and cut into 4-6 squares. (If you used a muffin tin for the ice cream, it is more likely that you can cover four ice cream balls, egg cups should allow for 6). Brush off any excess starch from the squares, and working with one ice cream out of the freezer at any given time, place the ice cream ball in the middle of the dough square, flattest side up, place that on a cling film and return it its vessel to help maintain the shape/manage the fiddly edges. Once back in its cup, bring all the edges of the dough together and gently pinch to seal, then finish with closing up the cling film. Repeat until you have made all of your mochi ice creams. Allow them to freeze again for 10 minutes before serving.
For tips on the shaping of the mochi ice cream, this video has been a boon, and there is a cute dog in it!
I have experimented with other fillings and find that no-bake cookie dough is just as delightful and a tad easier to work with. Get creative, as I have seen mochi balls filled traditionally with sweet beans or more off the cuff things like chocolate coated strawberries! As always, be bold, have fun and enjoy!
KFC Fried Rice
Using your leftover fried chicken in fried rice is amazing in that you get all of the flavour and seasonings from the chicken in your dish. By frying the chicken again you also revitalise the crisp and skin from whatever soggy state it may have succumbed to in the fridge. It also doesn't hurt that the dish is usually busy with so many flavours, textures and colours that anything you add to it benefits from the ensemble.
Day-old rice is usually the best to make fried rice with, but if you are going to make a fresh batch of rice for it, reduce some of the water and once it is cooked, leave the lid off whilst your prepare all the other items going into your fry, as this will help it dry up and not be so gummy in the pan.
For three servings of rice I use the following to transform it into its fried counterpart:
- 3 garlic cloves, minced
- 4 spring onions, sliced, julienned, cut on the angle, however you like.
- 2 eggs
- 2tbsp soy sauce
- 1 large yellow onion, julienned
- Fried chicken, deboned and shredded/rough chop
- Black pepper to taste
Optional ingredients:
- Tomatoes
- Coriander
- Cucumber
- Kimchi
Heat a pan over high heat with some vegetable oil, enough to coat the bottom. Once the oil is shimmering, add the onions and blister. Reduce the heat to medium-high and add your garlic and spring onions, sautéing until the garlic is fragrant and the spring onions are lightly wilted. Add in your rice and mix, then make a well in the middle, if you need more oil before adding the eggs, add it now to the well and let it heat up, then crack your eggs into the centre. Let the egg whites cook, then mix through the rice, breaking the yolks, this should give you a nice definition of egg that is still runny enough to coat other ingredients whilst cooking further. Make another well, and with as much of the chicken skin down, add the chicken to the middle and let it crisp up before mixing all of the contents together. Season with the soy sauce and black pepper, adjust as desired.
This is where the optional items come in. If you like you can add tomatoes now, with some coriander, and cook through, just until the tomato has become soft. This is a nice addition if the rice is SUPER dry, as it will bring some moisture to the dish. Kimchi can either be fried into the mix or added as a topping up to you, and the cucumber is a fantastic topping that brings a cool crunch and can make up if some over salting has happened.
Serve the fried rice hot and maybe even pair it with some of that Prik Nam Pla you've had a go of making! Salt, fat, acid, heat - sounds good to me!
National Fried Chicken Day
To make the chicken you will need:
- 1-1.5kg of chicken
- Salt and ground black pepper to taste
- 2 large eggs
- 59mL milk
- 200g crushed corn flakes
- 1 tsp cornflour
- Position a rack in the upper third of the oven and preheat to 175C.
- Whisk together egg and milk in a bowl that you can dip the chicken in.
- Combine cereal, cornflour, salt and pepper to taste in a shallow bowl.
- Rinse and pat dry your chicken portions, seasoning with salt and pepper.
- Dredge the chicken pieces by first dipping them in the egg mixture, then transfer to the shallow bowl with the seasoned cereal mix, really stick the crumb to the chicken with your fingers, if necessary.
- Arrange the chicken, skin side up, on the baking sheet. (Use a Silpat or nonstick foil to prevent them from sticking to the tray)
- For extra crunch and flavour, you can spoon 2 to 3 tablespoons of butter of the chicken.
- Bake until the chicken is crisp and golden, 45 to 60 minutes. Once the juices run clear or a thermometer indicate the chicken is done, serve hot out of the oven.
If you are a fan of sweet and salty pairings, a dipping sauce of maple syrup, cinnamon and Tabasco really makes for that chicken-and-waffle goodness that is beloved in the States.
Prik Nam Pla
To make Nam Pla you need:
- 250ml Fish sauce
- 175ml Lemon juice (or 250 if you like sour like me)
- 3 Tbsp of sliced fresh chillies
- 8-10 Garlic cloves, minced
- 1 tsp Sugar
- 4 Spring onions, chopped
- 2 Tbsp Coriander, chopped
- 3 Tbsp Water
In a container/mason jar add the fish sauce, lemon juice, garlic, chillies, water and sugar. Taste and adjust according to taste. Add the vegetables, give a good stir and let it infuse overnight.
As the sauce will get hotter the longer it infuses, I would say use less chilli to begin with. It is always easy to add heat but you can't remove it, and if the chillies are strong, which you will smell the heat as you slice it, you can adjust accordingly.
Whilst this sauce is traditionally for seafood and omelettes, I find it goes really well with burritos, most rice dishes, salads (depending on the salad), and steak. You could even be bold and bring this to the 4th of July cookout! Whatever you decide to top with this, enjoy!